Monday, September 30, 2019

Halloween Finishing Spree Day One

Hi, stitching friends!

If you're like me, you've got a bin or a drawer full of finished-but-not-finished projects. And if you've been reading my blog, you know that "finishing" is a four-letter word in my book. I don't usually enjoy it. But thanks to some inspiration from all of you, I've been on a finishing spree.


"Moon Over Blackbird," a freebie from Lizzie*Kate, was in my to-do pile. I stitched this in 2018 and featured it on the blog in this post. It is stitched on 32-count coffee/tea-dyed linen. I used colors I had on hand, as well as some of the called-for colors.


I laced the stitch onto foam core and added a fabric-covered chipboard backing. Then I joined the two together and pinned two layers of ribbon to the outside.


Both ribbons were from my stash of old Stampin' Up supplies. I used the orange chevron ribbon for the hanger, and then folded it in half to go around the outside. Then I layered a ruffled ribbon over that, picking up the light and dark oranges in the pumpkin. A sweet, simple little finish to help kick off fall and Halloween!

Hello, Green Tomatoes!


Last night, our local weather forecaster said, "Freeze warning for Boise tonight. Better get out and harvest what you can now. The growing season is OVER." Ugghhhh.

Winter is coming.....

My husband spent the weekend at his family ranch in central Idaho, and he had to brush four inches of snow off the car before driving home.

When he got home, we spent a good two hours out in the garden picking green and mostly green tomatoes. I estimated that we had 100 pounds out there, and I think I may be right. We've had to do this in the past, and while it does take time, they do eventually turn red.

I looked up "how to make green tomatoes turn red" and a YouTube video showed this lady wrapping each little tomato in tissue paper. I nearly laughed myself to death. Can you imagine? Another had a guy putting them in a paper sack with a banana (which gives off a gas that speeds the ripening process). I'm going to try that this year (with lots of paper sacks and lots of bananas). Hopefully it will speed up the process. In any case, we will have tomatoes well into fall and early winter.

See you again tomorrow, friends. I'll have another fall/Halloween finish to show you. Until then, I hope you have lots of time to stitch!

Monday, September 23, 2019

Autumn Is Here

Hi, stitching friends!

Autumn is officially here. We are enjoying the perfectly warm 72 degrees of late summer here in Boise, but cooler days are not far ahead.

I'm welcoming fall with a cute finish called "Autumn is Here," a freebie from Maja at The Snowflower Diaries. You can get the free chart here and you can visit Maja's Etsy shop here.


I stitched Autumn is Here on 32-count "Fog" linen by Picture This Plus, using my own color combination: DMC 310, DMC B5200, Weeks Dye Works (WDW) Molasses, WDW Clockwork, WDW Crimson, Colour & Cotton (C&C) Primitive Vines and C&C Bumblebee.


I found the metal flowery pumpkin at Hobby Lobby. I laced the stitching onto chipboard covered with a piece of batting, then mounted that on another piece of chipboard covered in gingham fabric.

I found the perfect little spot in my kitchen to hang this. Welcome, autumn!

I hope you have many warm (not too hot, not too cold) days ahead, and lots of time to stitch. Thanks for stopping by!

Sunday, September 22, 2019

Goodbye Summer, Hello Football!

Hi, stitching friends!

Can you believe that tomorrow is the first day of fall? When you think of fall, what comes to mind?

Cool weather. Pumpkins. Turning leaves. Sweaters, maybe. Definitely football.

On Friday, my husband's aunt took us and two of our friends to the Boise State University versus Air Force game. We are all BSU alumni, and our friends are season-ticket holders, but my husband and I haven't been to a game since we were students! And that was a loooong time ago.


We couldn't believe how much the university has changed in the years since we lived on campus. We've been to BSU for various reasons over the years, but driving through to the stadium, we saw that so much has changed. If I were a student there now, I would be so lost.


My husband's aunt has her own suite at the stadium, and the view of Boise was great! No wonder Boise, or "Les Bois," means "City of Trees."


The game was great! BSU won 30-19. Always so much more fun when YOUR team wins, isn't it? And the suite was wonderful. The whole front window opened so we felt like we were really part of the crowd, but when it got cold we could close it and stay warm. Definitely a treat. The view of the Blue Turf was unbeatable.

A Good Weekend


Saturday we went to see the new Downton Abbey movie. Have you seen it yet? We loved it. I love the music, the clothes, the drama, the cinematography... everything about it. I just wish the series didn't end. Do you get attached to characters in TV shows and books like I do? When they end, it's like saying goodbye to friends.

Today I have Whole30 Classic Chili ( <--- clickable link for the recipe) going in the slow cooker, and we've been watching football all day. I didn't used to like (or understand) football, but when I was pregnant with my son, my husband and I would cuddle in our big overstuffed living room chair and watch the games. Once I understood what a first down was (ha!), it started to click. Now I love it.

Do you have a favorite team? Believe it or not, I don't! When I was very young, I adored the Dallas Cowboys cheerleaders and I wanted to be one, but I didn't know or care about football. Now that I watch it, I like the Seahawks (my mother-in-law's favorite team), and I enjoy watching Patrick Mahomes with the Chiefs. I used to not enjoy the New England Patriots (because they always won), but I decided that if I started cheering for them, maybe watching them would be more fun. I was right. Go Patriots! (Ahem... this does not mean I have a team yet.)

And the winner of the "Farm Fresh" chart is...


Congratulations to Catherine (diamondc), who won the giveaway for the "Farm Fresh" chart by Country Cottage Needleworks.

You can visit Catherine's blog, "I Love to Stitch," at diamondc-diamondc.blogspot.com.

Until next time! Be well, and I hope you have lots of time to stitch.

Monday, September 16, 2019

Thankful

Hi, stitching friends!

I have a lot to be thankful for today.


1. The generosity of good friends.


Robin in Virginia sent me a gorgeous (I do mean gorgeous) assortment of charts from her stash. I am humbled beyond words. I want to stitch everything. Right now. Can we just hit the "pause" button on time so I can? Please?

Expect to see beautiful things on this blog in the future, and I will be sharing the love. Thank you, Robin!


2. A good call from my doctor's office.


My tumor marker (a measurement of a protein expressed by tumors) is stable, so we are going to put off scans for a month. That's such good news!


3. Found treasure.


Look what I found on my walk tonight! And to think I almost didn't take Scout for a walk this evening because A. I was oohing and aahing over my goodies from Robin and didn't want to stop, and B. it's awfully windy out tonight. But the little guy has gotten quite used to our evening strolls, and he would not take no for an answer. He kept flopping at my feet, swiping at my toes with his paws and whining.

So I put on a baseball hat and my Skechers slip-ons and out we went. We were almost home when I spotted this pile of old fence boards my neighbor had bundled up and put out with the trash. I rushed home, grabbed my hubby and said, "Help me haul away our neighbor's trash!"

Is it just me, or does anyone else see what I see in this?

Think "rustic." Think "Priscilla and Chelsea finishing ideas." Now do you get my excitement? I have several projects in my finished-but-not-finished pile or my want-to-stitch pile that would look great finished with some torn homespun and mounted on one of these rustic boards. And look how many! Did I hit the gold mine or what? Any that I can't use will be great firewood in the outdoor fire pit. Hooray!

Here's hoping that you have lots of blessings coming your way today, too.

Friday, September 13, 2019

Winner of Halloween at Hawk Run Hollow Chart

Congratulations to Astrid's Dragon. Astrid won the Halloween at Hawk Run Hollow chart giveaway.

Woot woot!

You can visit Astrid's blog at: astridxstitching.blogspot.com

Have a wonderful weekend, stitching friends!

Thursday, September 12, 2019

Giveaway Reminder

Hi, stitching friends!

A quick reminder about my two current giveaways. If you are a no-reply commenter (meaning I cannot get your email address from your profile), please send me your email address.

Halloween at Hawk Run Hollow


I will be drawing for the Halloween at Hawk Run Hollow chart tomorrow, Friday the 13th of September! (How perfect is that?)

Because of postage costs, I would like to limit this giveaway to U.S.-based readers. If you would like to enter the Halloween at Hawk Run Hollow giveaway, be a sidebar follower and answer the following question in your comment (and please make sure I have your email address):

What was your favorite Halloween costume?


Farm Fresh


I will draw for the Farm Fresh chart next Friday, September 20.

If you would like to enter the Farm Fresh giveaway, please be a sidebar follower and answer this question in your comment:

What is your favorite thing to grow in your garden? If you don't have a garden, what is your favorite vegetable?

Please send me your email address if you are a no-reply commenter. (You can email me by clicking on my profile above.)

Good luck!

Saturday, September 7, 2019

The Ugly Garden


Hi, stitching friends!

I am a lazy gardener. You can probably tell that from the photo above. As you can see, I don't prune my tomato plants (and I usually forget to fertilize them), but they grow tons of tomatoes anyway. One year we harvested between 200 and 300 pounds of tomatoes in one summer (from three or four plants).

A couple of years ago (the last time I grew tomatoes), all of the tomato plants died, one by one. I bought them from a greenhouse I had never bought from before, so we took a couple of years off from growing tomatoes and I avoided buying from that greenhouse this year.

It was a rocky start to 2019. About half of my plants were frost killed in May and June.

But the weather stabilized and my survivors, well.... flourished! In the photo above, the Early Girl tomato plant in the foreground is as tall as I am (about 5' 7") and weighs so much that it fell over a few days ago. It has a wire cage for support, but the plant got too heavy. Luckily we had a steel post tucked away so my son grabbed the post pounder and put it in the ground, then we tethered the wire cage to the steel post. Poor plant.


I'm getting five to ten red tomatoes every couple of days, which is a perfect pace, but I know that soon I will be overwhelmed with tomatoes. That's a good problem if you ask me.


This Payette variety is brand new for 2019 and was developed here in Idaho. It's a short, stocky plant, ideal for containers, so I have it in my raised bed. It produces tons of tomatoes then stops producing when the weather starts to turn. My plant is a little over a foot tall, but the stem is as thick (if not thicker) as the tall plants, and as you can see, it's already a hard-working producer. Looking forward to getting some ripe tomatoes from this one!

Farm Fresh


Robin in Virginia surprised me with the chart for "Farm Fresh" by Country Cottage Needleworks. I decided it would make the perfect gift for my favorite farmer, Jan. She has a booth at the farmers' market in my hometown, and in my opinion, her booth is the absolute best. She sells such a creative mix of heirloom veggies. Jan introduced me to romanesco (look it up and look at images... you will be amazed), and she grows the best garlic (purple!) I have ever tasted. She sells purple green beans! And her veggies are cheap, too. It must be a labor of love, because I know how much work and expense goes into a garden.

I thought surprising her with this to let her know how much I appreciate her would be a nice thing to do.

Farm Fresh by Country Cottage Needleworks
Stitched on 32-count Flax Belfast linen
with Colour & Cotton and DMC threads

I finished Farm Fresh into a flat-fold with handmade two-tone cording and a rooster charm. I substituted most of the called-for colors with Colour & Cotton threads (Medieval for the planter boxes, Laurel for the leaves and sunflower stems, Egg Yolk for the sunflowers, and Jack-O-Lantern for the carrots).


The pattern as charted had plain cross stitches for the grass beneath the farm stand. I changed that to a double herringbone stitch using DMC 469 and 3347.

I thought the rooster charm from Bohemian Findings on Etsy would be a nice addition.


In keeping with Robin's spirit of giving, I would like to offer the Farm Fresh chart as a giveaway. If you'd like to win it, please be a sidebar follower and answer the following question in your comment: What is your favorite thing to grow? If you don't have a garden, what is your favorite vegetable?

Have a wonderful week, dear friends. I hope summer holds on a little longer for you... not too hot, though!

Thursday, September 5, 2019

Lacing Tutorial

Hi, stitching friends!

Several of you have asked about how I do the lacing when I frame cross-stitch. I've been promising Mary (of Stitching Friends Forever) a tutorial, so here goes.

All the photos in this tutorial are clickable in case you need a closer look.

Did you know?

Not many professional framers lace needlework these days. It can be time consuming, and when they're running a busy shop, it's often not cost effective. If you know how to lace your own needlework, you can:

  • Save money by framing things yourself.
  • Appreciate what goes into lacing so you know why your framer charges a lot to do it (IF they do it).
  • Lace things yourself if your framer refuses to do it.

Scary, scary

Some professional framers use staples and/or glue instead of lacing. If this makes you shudder (like it makes me shudder), read on.

Supplies

  • Acid-free foam core (1/4" or 3/16" thick)
  • Ruler
  • Cutting tool (X-acto knife or box cutter)
  • Cutting mat
  • Straight pins, preferably with an easy-to-grab head
  • 1/2" sequin pins
  • Cotton thread (heavy-duty mercerized cotton thread or fine crochet thread)
  • Needle
  • Scissors
  • Optional, but nice to have: light table


Step 1: Cut acid-free foam core to the size of the inside of your frame. Be careful. Measure twice and cut once. It's better if the foam core is cut just slightly smaller than the size you need, but not bigger than the size you need or it won't fit in the frame.


Step 2: Center the needlework on the foam core. I have an LED light table that comes in super handy for this step ($15-$20 on Amazon), but if you don't have one, use a window to help you center your stitching on the foam core.


Center your stitching on the foam core. Take your time.


Step 3: Pin the needlework to the foam core. Starting in a corner, insert two ball-head straight pins into the foam core.


Next, move to the centers out from the corners and insert ball-head straight pins into the foam core to hold the needlework in place.


Continue all the way around on the corners and centers, being careful to keep your needlework centered on the foam core. Make adjustments as necessary. Take your time. This step is important!


Next, insert 1/2" sequin pins between each of the ball-head straight pins, spacing them about 1/4" apart.


Continue until you've gone all the way around.


Next, remove the ball-head straight pins and replace them with 1/2" sequin pins. You want those bulky ball-heads out of your way when you start lacing, or you will curse a lot.


Step 4: Get ready to lace! I've heard people suggest using dental floss for lacing needlework, but I strongly caution against it. Chances are, you've stitched your piece on linen or another natural fiber fabric. Dental floss is made of a synthetic fiber, such as nylon, which is stronger than your natural fiber. If you use dental floss or polyester or nylon thread for lacing, you're risking tearing or weakening your linen fabric over time.

Use cotton thread. Mercerized heavy-duty cotton thread or a lightweight cotton crochet thread would be good. I pick up old spools of cotton thread when I'm thrift-store shopping, such as the one in the photo above. The color doesn't matter because it will be in the back and no one will see it.

Edit (9/6/2019): Robin in Virginia pointed out that it's best to choose white, off-white or cream-colored thread in case your needlework is exposed to dampness. You wouldn't want colored thread (which may not be colorfast) to run and ruin your needlework. I wholeheartedly agree!


Put that spool of thread on a spindle. Some people use a nail, but I found that if I stick a chopstick into my desk junk organizer thingy, it works great.


Step 5: Let's lace! Thread a sharp needle and insert it into the back of your now-pinned needlework, about 1/2" from the edge of the fabric and lined up with one corner of the foam core. See photo above for reference.


Go back and forth, inserting the needle about 1/2" from the edge of the fabric and spacing your laces 1/2" to 3/4" apart. Just go back and forth, back and forth, pulling extra thread as you need it. It will be loose and sloppy. No worries. I hope you have good music going on in the background. For me, it's Aretha Franklin, Ray Charles and old R&B. That's my happy music.


Continue lacing back and forth, back and forth, until you get to the other end. Stop at the end of the foam core, not at the end of the fabric. See photo above.


Now, pull your needle off the thread, and tie a knot in the end of the thread. The other end of the thread is still attached to the spool on the spindle.


At the knotted end of the thread, start pulling your laces tight, like you're lacing up a shoe or a corset. (Heaven forbid any of you wear a corset, but you get the point!)


Keep going, pulling the thread tight until you get to the end. Stitch the thread down tight and snip it.


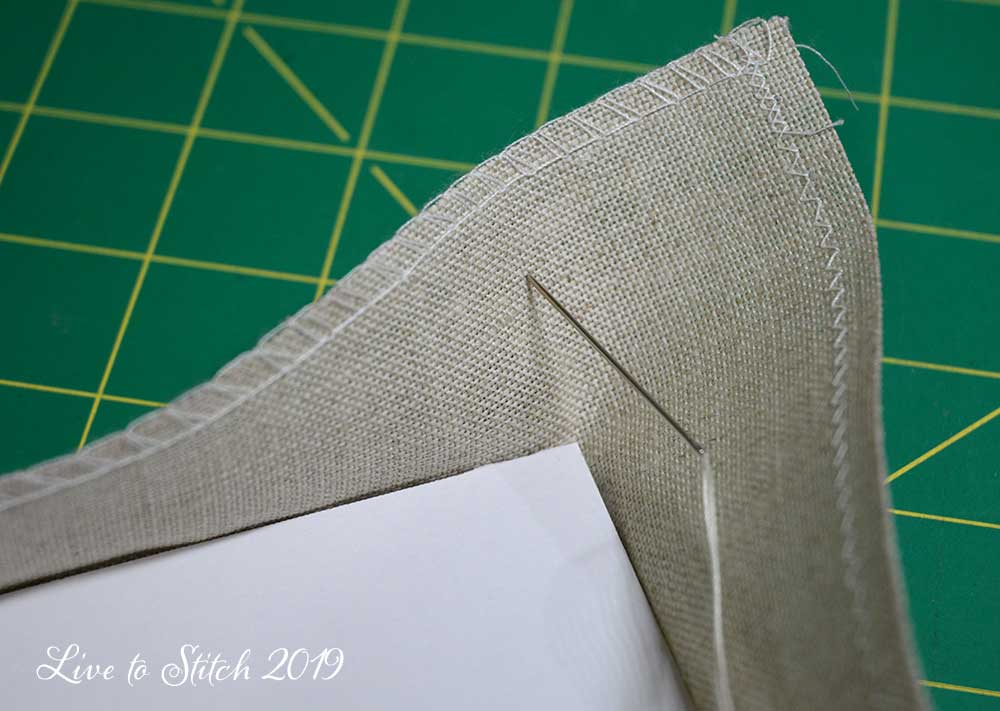
Step 6: Tack down the corners. Using your fingers, square up one corner and finger press the fabric, forming a nice square corner.


Thread your needle with a shorter length of thread, about 12" long. Tie a knot in the end. Poke the needle into the corner as shown above and pull it through, pushing the knot into the fold so it's hidden.


Whip stitch the corner down and tie it off when you get to the end.


Repeat for all the corners.


Step 7: Repeat the lacing in the other direction. Refer to step 5.


Step 8: Remove all the 1/2" sequin pins. You may be tempted to leave them in as a security blanket, but trust yourself. You did fine. You don't want those pins to rust if you're ever in a high-humidity environment. And you can use them again next time you lace something.


Step 9: Put your laced piece into your frame. If you don't plan to change out the stitched pieces in the future, you can cover that ugly back with some decorative paper cut flush with the edge of the frame.


Voilah! All done!

I hope you found this tutorial helpful. If you have ANY questions, please ask. I love questions!

Have a wonderful day, friends, and I hope you try lacing if you haven't already.

Monday, September 2, 2019

Scanxiety and a BAP finish


Hi, stitching friends!

Oh.... where to begin?

At the end of June, I had routine scans for my metastatic breast cancer. Just checking in, making sure treatment is working. No big deal (hopefully). I felt fine, so I had no cause to worry. But I worry anyway.

It's called "scanxiety" (scans + anxiety = scanxiety).

After two years of good news, this one hit me like a punch in the gut. Some new "spots" showed up in my spine, but the tricky thing with bone mets is that we can't tell from scans whether they are active tumors or scar tissue (from dead tumors). My doctor said it could also be something called "treatment flareup," where tissue surrounding a dying tumor becomes inflamed.

So, new tumor growth = bad. That means my treatment is no longer working. But, treatment flareup = good. That means treatment is working.

The only way to tell is to wait, see how I feel until my next appointment, and repeat scans to see if the spots are bigger.

Fun!

Enter a Vacation and Whole30


For the longest time, I just didn't know what to say. So I didn't say anything. I've been absent from my blog and from many of yours, and for that I am so sorry. Thank you to my friends who have sent me beautiful cards and emails checking in on me. I love you for it.

At the beginning of August, I decided to make a drastic change to my diet. Did I want to lose weight? Uh... yeah. (Who doesn't relish the thought of clothes fitting better?) But my main motivation was to do everything I could to affect the outcome of my situation. If changing the way I eat can extend my life at all, it's worth giving up some goodies.

I really don't think I can cure a disease with no cure by eating better, but if I can feel better and possibly increase the number of my "good" days, then heck yeah!

Whole30 (www.whole30.com) is very similar to the Paleo diet. Lots and lots of vegetables, a little fruit, protein and healthy fats. No dairy, grains, legumes or unhealthy fats. It was a shock at first trying to get used to it, but now that my Whole30 has ended and the "training wheels" are off, I have very few cravings for sugar and junk food. My son keeps trying to get me to celebrate completing the Whole30 by going out for cookies and ice cream, and I just don't want them.

And...my clothes are fitting a lot better.

I see my doctor again next week, and I can honestly say I feel so much better in terms of everyday well-being, and I still don't have any pain where these new spots showed up in scans. I'm looking forward to seeing what my labs say about my health.

A BAP Finish


What is a BAP? My friend Arlene at Nanaland shared the phrase with me, and it stands for "Big Ass Project"! Don't you love it?

I finally finished Halloween at Hawk Run Hollow! Woot woot! I started it the third week of January 2019, and finished just after midnight on August 29, 2019. My goal was to have it done by the end of August so the framer would have time to frame it in time for October. I'm taking it there after the long weekend is over and I know it's going to cost a fortune, but it's worth it. I'm not tackling this one myself.


Last time I wrote, I was about half done with block 9. Here it is, all finished.


I love the long-stitched wraps of the mummy.


The green diamond pattern in the background stitched up very quickly, even though it may look like a lot of work.


Here is block 10. Lots of scary eyes and swampy creatures!


Rawrrr...... Scary alligator, or swamp monster. Poor frog!


Block 11 completed. I love the designers' creativity, how the steam from the locomotive becomes ghosts.


This way to the Hollow......


And finally, block 12 completed.


That was a LOT of DMC 829. I ran out twice! The skeleton teeth are stitched over one.


The BIG Reveal


....is coming later. I want to show you the whole thing after it's framed. Sorry, friends, but you're going to have to wait.

Now that it's finished, I feel so free to work on anything I want. I have a lot of work to do on the SAL with Mary and RJ at Stitching Friends Forever, and I want to stitch some Christmas ornaments. But you know what's calling my name? The Shores of Hawk Run Hollow. Call me crazy.

Halloween at Hawk Run Hollow Giveaway


To celebrate finishing Halloween at HRH, I'd like to offer the chart to one of you. It was so much fun to stitch, and I would love to see it go to someone who wants to stitch it and who might also pass it along to a friend afterwards. To save on postage, I would like to limit the chance to win to a USA-based stitcher.

If you would like to win the chart, please be a sidebar follower and leave a comment answering this question: What was your favorite Halloween costume or memory?

Thanks for reading! I have more in the works to show you, but I'll save those projects for another time. Thinking of all of you, especially those of you in the south facing Hurricane Dorian. Be safe.