Showing posts with label framing. Show all posts

Sunday, October 25, 2020

I've Been Framed

Hi, stitching friends!

Boy, do I have a lot to show you today. Now, before you say, "Wow, Meg, you've been really busy," keep in mind that I stitched these over the past year. I placed a couple of big orders from Franken Frames and framed these a couple of months ago. I've been waiting for Halloween to get closer to show you, and I've been waiting for my dear hubby to help me with the hanging hardware on the back. That is the one part of the framing process that I do NOT enjoy one bit.

Thanks to my crabapple tree in the backyard, which sacrificed some of its lovely fall foliage for my photo shoot.

First up is Lizzie Kate's 2019 Halloween Mystery Sampler. Last year I showed you the drum I made from the bonus chart that came with this sampler. You can see that post here. I finished the sampler soon after that, but it has been in my "box of shame," a.k.a. unfinished finishes, since then.

Lizzie Kate Halloween Mystery Sampler 2019
Lizzie Kate 2019 Halloween Mystery Sampler
Stitched on 32-count Fog by Picture This Plus
with called-for overdyed threads
Frame from Franken Frames

I love everything about this sampler: the colors and the scared look on the moon at the top and the skinny little black house on the bottom.

Tall, skinny pieces like this are great when you have limited wall space. They fit in the most unexpected places. I hung this one on the narrow bit of wall between my bedroom door and the linen closet. It goes great there, and I see it every time I go into my bedroom.

Have you ever stitched a mystery sampler? What was it? Did you enjoy the process?


Next up is one that I've seen a lot of people stitching this year, Halloween Quaker by Lila's Studio. 

Halloween Quaker by Lila's Studio
Stitched on 40-count Murky by Picture This Plus
with called-for overdyed threads
Frame from Franken Frames

Honestly, I would not have picked this chart up myself, but I'm glad I did. Last winter when we were on our annual Oregon Coast trip and driving from Portland to Depoe Bay, my husband and I stopped at Starlight Stitchery in Corvallis. While I browsed, I told him if he saw anything he liked to show me. He picked out this chart.

And I really wasn't sure about the fabric. It called for Murky by Picture This Plus. Since I don't have a local needlework shop, I order almost everything online. When this fabric came in the mail, my first thought was "Yuck!" But that was apparently just me, because everybody else who saw it - my husband, my son, my mom - were like, "Ooh... that's neat!" I do like it with the stitch, and I'm glad I went against my instincts (which were to send it back and get something else!). It really is perfect for this stitch.

My favorite "motif" was the little row of houses with their bright yellow and orange glowing windows.

Halloween Quaker by Lila's Studio

There is a lot of black and variations of black in this sampler, so getting through the whole thing was hard. I had to take "color breaks" once in a while and stitch other things that made me happy. But I think the end result is quite striking. The few pops of color in it really POP. When I got about 75% done, I just plowed through to the end. I was ready to be done with it and move on to other things.

Halloween Quaker by Lila's Studio

I love the spiderweb and the spiders, but they gave me FITS. A word of advice: if you stitch this sampler, go to the Lila's Studio website and download the corrected chart for this motif. I found out (too late, after a lot of stitching that I didn't want to have to frog out) that there were errors in the printed chart I bought. I almost put the whole stitch away for a very long time. I was that frustrated. I'm glad I persisted.

The cats motif is another favorite.

Halloween Quaker by Lila's Studio

The designer has a photo on the cover of the chart of the cats motif stitched on orange linen and finished into a biscornu. It would also make an adorable Halloween ornament.

And finally, my favorite of the three stitches I'm showing you today: When Skeletons Dance by The Drawn Thread.

When Skeletons Dance by The Drawn Thread
Stitched on 32-count linen
with called-for overdyed threads
Frame from Franken Frames

I went through my notes and I apparently didn't write down what fabric I stitched this on, but I know it was 32 count.

Those of you with a good eye for color can probably tell I ran out of floss at one point in the house and in the moon. When I got additional floss, the dye lot was very different than what I started with! I was very frustrated and worried about it, but I went with it, and I have to say, I like the result. The house looks old and neglected with peeling, fading paint. And I think that's how the moon really looks through layers of atmosphere and thin clouds. So all my worry was for nothing.

When Skeletons Dance by The Drawn Thread

 The ghosts in the windows say, "Boo!

And I love this jolly skeleton.

When Skeletons Dance by The Drawn Thread

He doesn't seem phased at all by the creepy spiders.

When Skeletons Dance by The Drawn Thread

And these spiders are SUPER creepy. The one in the crow's mouth at the top of the house uses a fat black seed bead, and the others use 4mm black buttons. (I could not find black buttons so I used a black Sharpie to "paint" some pastel buttons black.) The effect of using beads and buttons for the spider bodies is truly terrifying. These spiders look (and feel) REAL!

When Skeletons Dance by The Drawn Thread

I don't like spiders, but these are cool. At least these don't bite.

What are your plans for Halloween? Do you celebrate Halloween? I know it's not everybody's cup of tea.

We like it because we have lots of young families with kids in our neighborhood, so in "normal" years we get loads of trick-or-treaters. This year is different, though. With Covid cases soaring in our county, the health department is advising that no one trick-or-treat. I hate to say it, but this year we are probably going to turn off our porch lights and pretend no one is home. It has got to be really hard on the little ones.

Hopefully families with young children can find safe ways to have fun and enjoy the holiday. I'm lucky that my son and his girlfriend are old enough that I could just buy a bag of candy and say, "Here you go." They'd be happy with that.

I hope you all stay safe and healthy, and remember: This, too, shall pass. They just never say when.

Saturday, September 26, 2020

Autumn is Here

Hi, stitching friends!

How is September already almost over? The days are getting shorter. Hubby is falling asleep on the couch at 8:30 p.m. because it's so dark outside, but I do like the temperatures. I wore a long-sleeve shirt to an appointment yesterday and I was glad I did. It's that time of year when A/C is still cranked up inside even though outside it's only 72 degrees.

Bittersweet September


Bittersweet September by Blackbird Designs

Have you ever stitched something you love, only to hate the finish? Aggravating, isn't it? You put so much work into something only to end up hiding it in a closet. That was the case for me with Bittersweet September by Blackbird Designs.

I stitched it last year. I loved the stitch and the autumn colors and the wonky way the "W" is bigger than all the other letters. (Why? Why not?) But when I put it in a thrift-store frame I had painted brown, it just looked blaaaahhh. So I put it away in the armoire for a year. I didn't know what to do to make it look better.

Franken Frames to the rescue! With a recent order, I made sure to get something for this sweet stitch. I love this frame. I think the walnut goes really well with the colors in the stitch, and I love the beaded edge.

Macintosh Mill


Macintosh Mill

Macintosh Mill was a Dimensions kit based on a painting by Charles Wysocki. I stitched this years ago, so long ago I don't even remember when. At the time, I wasn't doing any framing myself, and framing can be expensive. It seemed like there was always something more important to spend the money on. So I folded it up and put it back in the package with the kit and forgot about it.

Fast forward 10 years (or more!). I was purging my old cross stitch magazines when I found the kit and the completed stitch folded up inside. I ironed it and again thought about having it framed. Not in the budget. I put it in a plastic storage bin with other completed stitches and forgot about it again.

Fast forward a year, and here I am framing things myself! And here you have it... Macintosh Mill, framed and ready for fall.

The horse and buggy, and the children and their dog (or goat?)...

Macintosh Mill
Rocking on the porch....

Macintosh Mill
The pumpkin patch and pumpkin pies...

Macintosh Mill
Hay in the loft...

Macintosh Mill
Apple picking...

Macintosh Mill
The water wheel...

Macintosh Mill
Sheep in the field...

Macintosh Mill
Late summer turning into autumn, a bountiful harvest, my favorite time of year....

Halloween at Hawk Run Hollow Reveal

If you've been reading my blog for a while, you'll remember that last year my big project was Halloween at Hawk Run Hollow by Carriage House Samplings. I started in January and finished at the end of August. I've shown each block as I completed it but never the whole thing.

The plan was to have it framed and ready for the blog in October last year, but there was a major mix-up at the framer and I didn't end up getting the fully finished project back until after Thanksgiving! They had it for about three months (can you imagine?). Apparently there was some misunderstanding between the framer and the supplier with the moulding I chose and it sat on a cargo ship in a dock somewhere all that time. The framer felt so terrible about the whole situation that she framed it in a plain black frame so I could at least have it on the wall for Halloween. When the correct frame came in, she reframed it, but I didn't want to show you a Halloween stitch just before Christmas.

Halloween at Hawk Run Hollow by Carriage House Samplings

I am so happy with the final result. I think the frame looks like creepy vines, and it picks up the shapes in the tree limbs and roots, the pumpkin vines and the swamp. The photograph doesn't show it well, but it's a really pretty dark gold with black undertones. The second photo shows more of a closeup of the frame next to the pumpkin square.

Halloween at Hawk Run Hollow by Carriage House Samplings


I hope you are staying well and continuing to do everything you can to keep yourself and the ones you love healthy. You are too important! Until next time... happy stitching!

Wednesday, August 26, 2020

Good Things

 Hi, stitching friends!

Earlier this month, my husband and I celebrated our 25th wedding anniversary. We had originally planned to go to Ireland and Scotland at the end of September, but cancer and Covid had other plans for us. Maybe next year? We spent a quiet day together and ordered yummy Mexican food (to go) from Jalapeños, one of our favorite local restaurants (he had chicken fajita nachos and I had shrimp al mojo de ajo...soooo good!), and we watched movies. It was quite a nice day. I tell this guy I would rather do nothing with him than something with anyone else, and I mean it.

Life has been pretty simple around our house. My husband has been working, minimizing trips out of town to reduce his potential exposure to Covid and to spend more time with me (yay!). My son and his girlfriend, who has been staying with us, started their senior year online August 17. He says he loves it. I love being able to hear his teachers and hear him ask questions, and I must say I'm pretty proud of the intelligent questions my son asks. He still needs a lot of nudging to get assignments turned in on time, but he likes being able to work on homework while his teachers give their lectures in Google Classroom.

I started physical therapy in July. I loved being able to walk in the pool. Have you ever had a dream where you're flying? It felt like that, being able to walk without a walker or crutches. I could just glide through the water without wobbling or limping or using anything to help me walk. I've had to put it off, though, because I may have a new fracture in my spine, which is making my at-home physical therapy (and simply moving) really painful. So for the moment, I'm taking it easy and will see what my doc says when we have my latest scan results.

Thank goodness for cross stitch, right? If I didn't have this to keep my mind occupied, I think I would go a little nuts.

Some of you have said you wish there was something you could do for me. Well... I do have a request. If you can, please check out Lady Dot Creates on Etsy. Lois has raised $100,000 for breast cancer charity, and she sells a beautiful scissor fob in her Etsy store, proceeds from which go to breast cancer research and awareness. Her shop is taking a break until this Friday, so check back soon. Many of you already know about her gorgeous hand-dyed trims, and she is simply a sweetheart.

La Vie Est Belle

The moment I saw La Vie Est Belle on Etsy, I fell in love. The shop, Stitches Through the Years, is new to me, but wow. The designer, Lana Lenskaya, is very talented and has a great eye for color. I stitched La Vie Est Belle ("Life is Beautiful") on 32-count Legacy by Picture This Plus with the called-for overdyed threads.

La Vie Est Belle

La Vie Est Belle

La Vie Est Belle

La Vie Est Belle

La Vie Est Belle

I framed La Vie Est Belle myself with a gorgeous antique-silver frame I ordered from Franken Frames. My friend Carol from Stitching Dreams has been ordering from Franken Frames for years, and I finally did, too. I am so pleased with the frames, the price, the service and the free samples. And it is such a treat to have a frame that is exactly the size I need. A lot of frames you find in the big-box craft stores or thrift stores are not deep enough to accommodate foam core because they are made for framing photos, and it rarely happens that one of them is exactly the size I need.

Goodness & Plenty

My friend Robin in Virginia blessed me a while back with a generous number of charts from her stash. One of them, Goodness & Plenty by Plum Street Samplers, was on my wish list for quite a while.

Goodness & Plenty by Plum Street Samplers

Goodness & Plenty by Plum Street Samplers

Goodness & Plenty by Plum Street Samplers

The crow and the goodness & plenty cushions are stitched on 32-count Stars Hollow Blend, and the alphabet sampler is stitched on 32-count Doubloon. I filled all three with crushed walnut shells and added handmade red cording to one pillow before deciding I really like them plain and simple. I backed all three with some red checked fabric that was a gift from my friends RJ and Mary of Stitching Friends Forever. (Aren't stitching friends the best?)

I would like to try using sawdust to fill pillows and pincushions. Any thoughts or suggestions on how it works or where to find it online that isn't too pricy?

Pure Silliness

I downloaded a new app on my iPad the other day that I can't stop playing around with. It's called "My Talking Pet." Every day I've been making a video for my husband. He comes home from work and asks, "Did Scout make a video for me today?" (I honestly think he would be disappointed if he didn't.) August is my husband's birthday month, so the video today is Scout asking about a birthday treat.


Stay Safe, Be Well

You are very important to me, dear friends, so please take care of yourselves during this difficult time. Watch out for your loved ones and your neighbors, and please remember that we will get through this if we look out for one another.

Thanks for stopping by!

Sunday, October 6, 2019

Autumn Leaves

Hi, stitching friends!

A few days ago I featured an autumn freebie from Ricami di Marula at Crocette a gogò. You can get the free pattern by clicking here.


I wanted to stitch this while our leaves were still so beautiful, so for the past few days this is all I've been working on. I finished it last night and framed it today. Isn't it sweet?

I've had this little mahogany 4x4 frame in my stash for more than 20 years! Isn't it great when you finally find a use for something? I thought about painting the frame green or white, but my son said I should keep it natural because he liked how it went with the tree trunk and branches.

I stitched "Autumn" one-over-two on 40-count Flax Newcastle with the called-for DMC thread, except I substituted DMC 817 for the called-for DMC 321. I thought the 321 was a little too fire-engine red and bright, and I wanted a more "orangey" red for the birds. I stitched the string in DMC 898, same color as the branches, instead of the called-for DMC 310.

I have to thank Carol at Stitching Dreams for recommending the 40-count Flax Newcastle as one of her favorite stitching fabrics. I bought a big cut of it because she liked it so much, and while I was stitching on it, I thought, "Where have you been all my life?" It had such a nice feel and I love how I could use just one thread.


I absolutely love those birds. I changed the legs a tiny little bit, removing a couple of stitches in the pattern so they would be more delicate.

I think this would be a fun stitch to alter for different seasons, using different color schemes. The acorn between the birds could be a Christmas gift and they could be cardinals, or, for spring, the acorn could be a little tied bouquet.

Autumn Leaves


I call your attention to the title of this post: Autumn Leaves. It has a double meaning. The local news tonight said we're going to get "winter-like" temperatures in the middle of the next week. I'm not sure I'm ready to hear that! But I do like it when the colder weather sets in because I like to make soup and homemade stock, and I start getting all giddy thinking about watching Christmas movies and getting busy with the holidays.

My heart goes out to all of you still suffering the heat. Hold tight. This, too, shall pass. They just never say when!

Be well, friends, and I hope you have lots of time to stitch.

Friday, October 4, 2019

Halloween Finishing Spree Day Five


Hi, stitching friends!

Welcome to day FIVE of my Halloween finishing spree. Today's finish is "Chic Witch," a free pattern from La Comtesse & Le Point De Croix. Click here for the pattern.


I stitched Chic Witch on 36-count Star Hollow linen by R&R Reproductions. I did not have the called-for threads and I didn't want to use all DMC, so I used:

  • Weeks Dye Works (WDW) Grasshopper - boot accents
  • WDW Taffeta - wording and purple stripes on sock
  • WDW Mascara - crow and spider
  • The Gentle Art Fragrant Cloves - orange stripes on sock
  • DMC 310 - blended with 535 for boots
  • DMC 535 - blended with 310 for boots

The designer does such beautiful work and she is very generous with her free patterns.


The pattern, on 36-count linen, fit perfectly in a 5x7 thrift store frame I painted with black chalk paint. For the skirt, I took some wired plaid ribbon, removed the wire and stitched a running stitch on one side to gather the pleats. I stuck the ribbon to the inside of the frame with some sticky dots and put the needlework, laced onto foam core, into the frame.


I blended DMC 310 and 535 for a heathered look in the boots. What do you think? And don't you just love that spider? (If it's possible to love a spider.)


This was such a fun stitch, and great because you can use any color combination you want, with any ribbon you have on hand.

See you tomorrow for Day SIX of my Halloween finishing spree! Until then, be well, and I hope you have lots of time to stitch.

Thursday, September 5, 2019

Lacing Tutorial

Hi, stitching friends!

Several of you have asked about how I do the lacing when I frame cross-stitch. I've been promising Mary (of Stitching Friends Forever) a tutorial, so here goes.

All the photos in this tutorial are clickable in case you need a closer look.

Did you know?

Not many professional framers lace needlework these days. It can be time consuming, and when they're running a busy shop, it's often not cost effective. If you know how to lace your own needlework, you can:

  • Save money by framing things yourself.
  • Appreciate what goes into lacing so you know why your framer charges a lot to do it (IF they do it).
  • Lace things yourself if your framer refuses to do it.

Scary, scary

Some professional framers use staples and/or glue instead of lacing. If this makes you shudder (like it makes me shudder), read on.

Supplies

  • Acid-free foam core (1/4" or 3/16" thick)
  • Ruler
  • Cutting tool (X-acto knife or box cutter)
  • Cutting mat
  • Straight pins, preferably with an easy-to-grab head
  • 1/2" sequin pins
  • Cotton thread (heavy-duty mercerized cotton thread or fine crochet thread)
  • Needle
  • Scissors
  • Optional, but nice to have: light table


Step 1: Cut acid-free foam core to the size of the inside of your frame. Be careful. Measure twice and cut once. It's better if the foam core is cut just slightly smaller than the size you need, but not bigger than the size you need or it won't fit in the frame.


Step 2: Center the needlework on the foam core. I have an LED light table that comes in super handy for this step ($15-$20 on Amazon), but if you don't have one, use a window to help you center your stitching on the foam core.


Center your stitching on the foam core. Take your time.


Step 3: Pin the needlework to the foam core. Starting in a corner, insert two ball-head straight pins into the foam core.


Next, move to the centers out from the corners and insert ball-head straight pins into the foam core to hold the needlework in place.


Continue all the way around on the corners and centers, being careful to keep your needlework centered on the foam core. Make adjustments as necessary. Take your time. This step is important!


Next, insert 1/2" sequin pins between each of the ball-head straight pins, spacing them about 1/4" apart.


Continue until you've gone all the way around.


Next, remove the ball-head straight pins and replace them with 1/2" sequin pins. You want those bulky ball-heads out of your way when you start lacing, or you will curse a lot.


Step 4: Get ready to lace! I've heard people suggest using dental floss for lacing needlework, but I strongly caution against it. Chances are, you've stitched your piece on linen or another natural fiber fabric. Dental floss is made of a synthetic fiber, such as nylon, which is stronger than your natural fiber. If you use dental floss or polyester or nylon thread for lacing, you're risking tearing or weakening your linen fabric over time.

Use cotton thread. Mercerized heavy-duty cotton thread or a lightweight cotton crochet thread would be good. I pick up old spools of cotton thread when I'm thrift-store shopping, such as the one in the photo above. The color doesn't matter because it will be in the back and no one will see it.

Edit (9/6/2019): Robin in Virginia pointed out that it's best to choose white, off-white or cream-colored thread in case your needlework is exposed to dampness. You wouldn't want colored thread (which may not be colorfast) to run and ruin your needlework. I wholeheartedly agree!


Put that spool of thread on a spindle. Some people use a nail, but I found that if I stick a chopstick into my desk junk organizer thingy, it works great.


Step 5: Let's lace! Thread a sharp needle and insert it into the back of your now-pinned needlework, about 1/2" from the edge of the fabric and lined up with one corner of the foam core. See photo above for reference.


Go back and forth, inserting the needle about 1/2" from the edge of the fabric and spacing your laces 1/2" to 3/4" apart. Just go back and forth, back and forth, pulling extra thread as you need it. It will be loose and sloppy. No worries. I hope you have good music going on in the background. For me, it's Aretha Franklin, Ray Charles and old R&B. That's my happy music.


Continue lacing back and forth, back and forth, until you get to the other end. Stop at the end of the foam core, not at the end of the fabric. See photo above.


Now, pull your needle off the thread, and tie a knot in the end of the thread. The other end of the thread is still attached to the spool on the spindle.


At the knotted end of the thread, start pulling your laces tight, like you're lacing up a shoe or a corset. (Heaven forbid any of you wear a corset, but you get the point!)


Keep going, pulling the thread tight until you get to the end. Stitch the thread down tight and snip it.


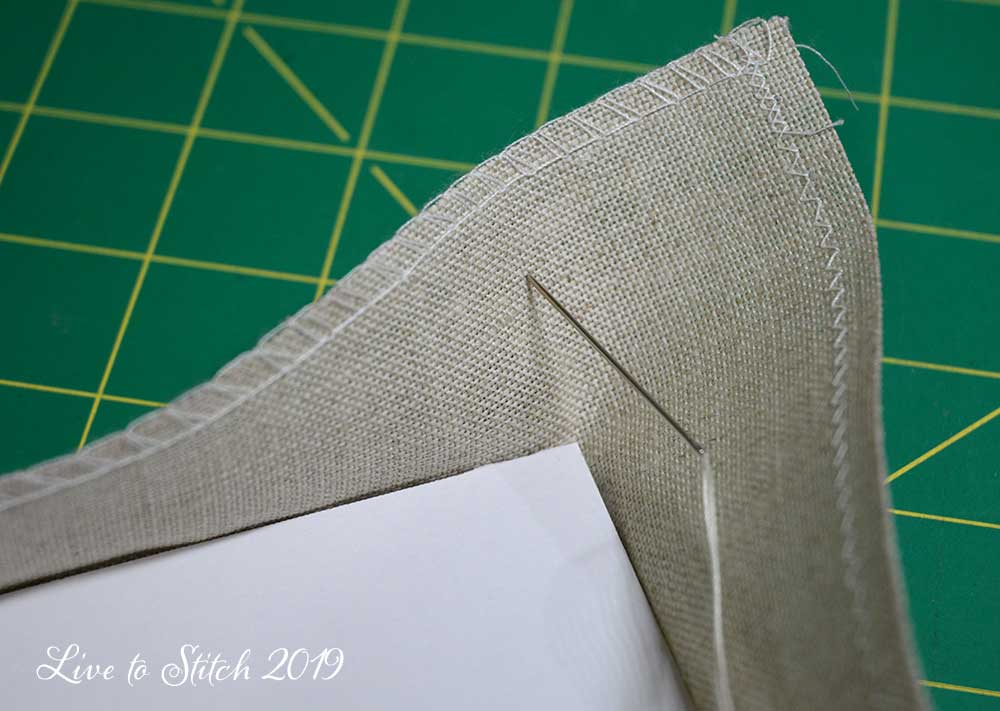
Step 6: Tack down the corners. Using your fingers, square up one corner and finger press the fabric, forming a nice square corner.


Thread your needle with a shorter length of thread, about 12" long. Tie a knot in the end. Poke the needle into the corner as shown above and pull it through, pushing the knot into the fold so it's hidden.


Whip stitch the corner down and tie it off when you get to the end.


Repeat for all the corners.


Step 7: Repeat the lacing in the other direction. Refer to step 5.


Step 8: Remove all the 1/2" sequin pins. You may be tempted to leave them in as a security blanket, but trust yourself. You did fine. You don't want those pins to rust if you're ever in a high-humidity environment. And you can use them again next time you lace something.


Step 9: Put your laced piece into your frame. If you don't plan to change out the stitched pieces in the future, you can cover that ugly back with some decorative paper cut flush with the edge of the frame.


Voilah! All done!

I hope you found this tutorial helpful. If you have ANY questions, please ask. I love questions!

Have a wonderful day, friends, and I hope you try lacing if you haven't already.